Getting started with ddev and Apache SolrCloud Service Add-on
I was recently using Drupal's contributed Search API module along with a database back end, but was starting to find that with nearly 100k articles, the existing database based index seemed to be struggling and would result in some queries timing out. For this reason I decided I wanted to evaluate Apache Solr, a separate Java based application that helps to offload the responsibilities of indexing and returning search queries from your Drupal based application. Initially, I struggled to set up solr locally using the Docker4Drupal wodby camp so after some time decided to also evaluate ddev and a contributed ddev Apache Solr Service add-on as was recommended by the drupal search_api maintainers themselves.
Setting up ddev and Drupal 10
During my time working with Drupal I have worked with various Developer setups. Switching from one to another usually has a bit of a learning curve and usually requires a little time and patience to transition.
Initially, I was a little nervous about how this would work with my existing setup. However, I was pleasantly surprised at how easy transitioning to ddev actually was. Being Mac based, I had previously installed ddev to have a look at it. However since then it has been updated with new features such as being able to list and remove add-ons. So to start with I decided to update ddev e.g. brew upgrade ddev
Once updated, all I had to do to setup ddev locally is:
- Open up code base in my preferred IDE (vscode) and make sure Docker Desktop is running.
- You will likely need an sql dump of your database (see last step). For smaller (allowed) sites the excellent contributed backup and migrate module could be useful.
- Run
ddev config. This will ask you a series of questions such as project name, project type and docroot. After this it is usually smart enough to figure set up the necessary config for Drupal - Run
ddev start, again from the command line or terminal. This will download any images that you require and start you instance locally. - Either run
ddev launchor click on the link generated after the previous step. This will launch your new dev build in your browser of choice. This will take you to the drupal installation screen and ask you to setup screen and require you to setup your admin user account and password etc. as required for a new installation. - Lastly, import you database. ddev supports running drush etc so one way to do this would be via drush. However, ddev also has its own db import command. e.g.
ddev import-db < ~/Downloads/dumpfile.sqlBy default the existing db is dropped unless specifying the--no-dropflag. Alternatively, if using the Backup and Migrate module, enable this via the ui or Drush and then proceed to import via the ui.
Installing ddev solr add-on
So far so good. Lets have a look now at adding the recommended ddev add-on for running apache solr with Drupal on top of ddev.
Looking at the list of recommended add-ons on the ddev website on the ddev site there is https://github.com/ddev/ddev-drupal9-solr which does appear to be more actively maintained and also comes with some tests. That said the repo that is recommended is https://github.com/drud/ddev-contrib/tree/master/docker-compose-services/solr.
UPDATE 23/01/24. This looks to have been superseded by https://github.com/ddev/ddev-solr
Here we see the main difference is explained
Running Solr in single core mode is not the recommended way anymore. The "Solr Cloud" mode is the preferred way and offers many additional features like Streaming Expressions and APIs that make management easier. These APIs allow to create and modify collections (cores), manage stopwords, synonyms etc. All from Drupal via UI or drush, via the Solarium library or your custom code. That’s a huge difference compared to Solr maintenance like you know it before!
To get started, first you will need to download a couple of files and place them in your .ddev project folder, namely docker-compose.solr.yaml and solr/security.json. Make sure security.json is placed in a 'solr' folder with the same .ddev folder. Once you have done this, restart ddev for the new solr instance to start with ddev restart.
docker-compose.solr.yaml
# DDev Solr Cloud service file.
#
# To access Solr after it is installed:
# - The Solr admin interface will be accessible at:
#   http://<projectname>.ddev.site:8983
#   For example, if the project is named "myproject" the hostname will be:
#   http://myproject.ddev.site:8983
# - To access the Solr container from the web container use:
#   ddev-<project>-solr:8983
#
# To use this in your own project:
# 1. Copy this file and the solr (including security.json) directory to your project's ".ddev" directory.
# 2. For Drupal:
#      - enable the search_api_solr_admin (this sub-module included in Search API Solr >= 4.2.1)
#      - create a search server using the Solr Cloud Connector with Basic Auth using username "solr" and password
#        "SolrRocks".
#      - press the "Upload Configset" button.

version: '3.6'
services:
  solr1:
    image: solr:8
    container_name: ddev-${DDEV_SITENAME}-solr1
    expose:
      - 8983
    # These labels ensure this service is discoverable by ddev.
    labels:
      com.ddev.site-name: ${DDEV_SITENAME}
      com.ddev.approot: $DDEV_APPROOT
    environment:
      SOLR_HOST: ddev-${DDEV_SITENAME}-solr1
      SOLR_PORT: 8983
      # The pre-trained OpenNLP models require a much bigger buffer.
      SOLR_OPTS: -Djute.maxbuffer=50000000
      #SOLR_HEAP: 1g
      ZK_HOST: ddev-${DDEV_SITENAME}-zoo:2181
      VIRTUAL_HOST: $DDEV_HOSTNAME
      HTTP_EXPOSE: 8983:8983
    depends_on:
      - zoo
    volumes:
      - .:/mnt/ddev_config
      - solr1:/var/solr
    command: bash -c "docker-entrypoint.sh solr zk cp file:/mnt/ddev_config/solr/security.json zk:/security.json && exec solr-foreground"

  solr2:
    image: solr:8
    container_name: ddev-${DDEV_SITENAME}-solr2
    expose:
      - 8984
    labels:
      com.ddev.site-name: ${DDEV_SITENAME}
      com.ddev.approot: $DDEV_APPROOT
    environment:
      SOLR_HOST: ddev-${DDEV_SITENAME}-solr2
      SOLR_PORT: 8984
      # The pre-trained OpenNLP models require a much bigger buffer.
      SOLR_OPTS: -Djute.maxbuffer=50000000
      #SOLR_HEAP: 1g
      ZK_HOST: ddev-${DDEV_SITENAME}-zoo:2181
      VIRTUAL_HOST: $DDEV_HOSTNAME
      HTTP_EXPOSE: 8984:8984
    depends_on:
      - solr1
    volumes:
      - .:/mnt/ddev_config
      - solr2:/var/solr

  solr3:
    image: solr:8
    container_name: ddev-${DDEV_SITENAME}-solr3
    expose:
      - 8985
    labels:
      com.ddev.site-name: ${DDEV_SITENAME}
      com.ddev.approot: $DDEV_APPROOT
    environment:
      SOLR_HOST: ddev-${DDEV_SITENAME}-solr3
      SOLR_PORT: 8985
      # The pre-trained OpenNLP models require a much bigger buffer.
      SOLR_OPTS: -Djute.maxbuffer=50000000
      #SOLR_HEAP: 1g
      ZK_HOST: ddev-${DDEV_SITENAME}-zoo:2181
      VIRTUAL_HOST: $DDEV_HOSTNAME
      HTTP_EXPOSE: 8985:8985
    depends_on:
      - solr1
    volumes:
      - .:/mnt/ddev_config
      - solr3:/var/solr

  zoo:
    image: bitnami/zookeeper:3.7
    container_name: ddev-${DDEV_SITENAME}-zoo
    hostname: ddev-${DDEV_SITENAME}-zoo
    expose:
      - 2181
    labels:
      com.ddev.site-name: ${DDEV_SITENAME}
      com.ddev.approot: $DDEV_APPROOT
    environment:
      # The pre-trained OpenNLP models require a much bigger buffer.
      JVMFLAGS: -Djute.maxbuffer=50000000
      ZOO_MY_ID: 1
      ZOO_SERVERS: server.1=ddev-${DDEV_SITENAME}-zoo:2888:3888
      ZOO_4LW_COMMANDS_WHITELIST: mntr, conf, ruok
      ALLOW_ANONYMOUS_LOGIN: "yes"
    volumes:
      - .:/mnt/ddev_config
      - zoo:/bitnami/zookeeper

  # This links the Solr service to the web service defined in the main
  # docker-compose.yml, allowing applications running inside the web container to
  # access the Solr service at http://solr:8983
  web:
    links:
      - solr1:solr

volumes:
  solr1:
  solr2:
  solr3:
  zoo:
solr/security.json
{
  "authentication": {
    "class": "solr.BasicAuthPlugin",
    "credentials": {
      "solr": "IV0EHq1OnNrj6gvRCwvFwTrZ1+z1oBbnQdiVC3otuq0= Ndd7LKvVBAaZIF0QAVi1ekCfAJXr1GGfLtRUXhgrF8c="
    }
  },
  "authorization": {
    "class": "solr.RuleBasedAuthorizationPlugin",
    "permissions": [
      {
        "name": "security-edit",
        "role": "admin"
      }
    ],
    "user-role": {
      "solr": "admin"
    }
  }
}
Add solr collection
Hopefully solr has started up and you should be able to access the UI from http://yourproject.ddev.site:8983/. Go and add a name for your collection e.g. yourprojectname
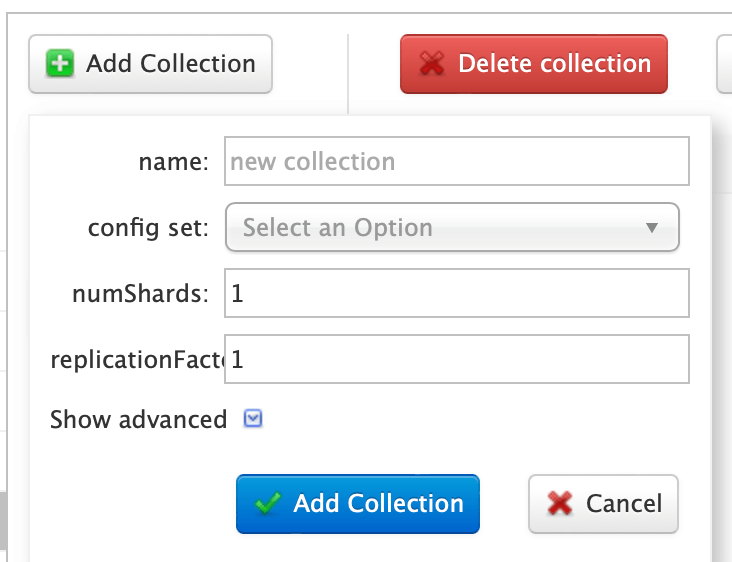
Go ahead and create your collection using the _default config set.
Install Drupal dependencies and configure:
- Make sure you have all your Drupal dependencies e.g.
ddev composer require drupal/search_api_solr - Enable the
search_api_solrmodule and thesearch_api_solr_adminsubmodule either using the web interface orddev drush en -y search_api_solr_admin - Create a Search API server at
admin/config/search/search-api-> "Add server" - Create a server with the following settings
- Set "Server name" to anything you want. Maybe ddev-myproject-
solr. - Set "Backend" to
solr - Set "Solr Connector" to
Solr Cloud with Basic Auth - HTTP protocol:
http - Solr node:
solr - Solr port:
8983 - Solr path:
/ - Default Solr collection:
your_project_collection_name(See above step). - Username:
solr - Password:
SolrRocks
- Set "Server name" to anything you want. Maybe ddev-myproject-
Go ahead and save the new server. If all goes well, you can see that Drupal is connecting with Solr and you should a you should see a notice pop up in Drupal along the lines "You are using an incompatible Solr schema". This is basically saying that the _default config set is not really compatible with Drupal and you need to use one that is. As Drupal can now connect with Solr the easy option is to use the UI button from the newly created solr search server to upload a compatible config set.
Alternatively, you can also use drush to upload the right config. It is also important to make sure the search_api_solr_admin is enabled as it provides additional functionality that is used here. Namely:
ddev drush search-api-solr:upload-configset ddev_solr_yourprojectid
where ddev_solr_yourprojectid is the name or id you used when you created your server in Drupal earlier.
Setting up the search Index and View
Without going into detail, now you have your solr server setup you should be able to now set up your index, selecting which fields you would like to index etc and then once indexed, you should be able to set up your Drupal View to search and display this index.
Summary
We have seen how we can get started with local development using Drupal 10 and Apache Solr Cloud (which also depends on Apache ZooKeeper for managing the config, in this case, security.conf) using the Docker dependent ddev and the contributed docker-compose-service available from the ddev contrib repo.
Setting up the Java based Apache Solr and Zookeeper to work with the PHP based Drupal site can seem like a daunted task. However, as with many things in life, once you know how it is actually quite straightforward. Certainly the benefits of using a distinct search system like like Solr along side a CMS such as Drupal can offer are certainly worthy of consideration especially if you have a lot of content to be indexed and searched.
Even for smaller sites, the solr search view offers a superior interface over the default one, and I would even consider installing as standard for every Drupal site install that requires a search facility.
Comments
Moving site background
Background on your site is distracting from the content.
Add new comment